
How to Play Drums: A Comprehensive Guide for Beginner Drummers
Ready to unleash your inner rockstar?! Want to know how to play drums with the best of them? Whether you're a young novice or a full-on adult just starting this crazy drumming adventure, understanding the basics is key. But don’t let all of the shiny metal bits and wood finishes intimidate you. As Neil Peart often wrote, drum sticks are just “lumps of wood” after all. In this comprehensive guide, we'll demystify drumming, help you choose your first drum kit, and get you on your way to playing your first groove.
Full Disclosure: This website uses affiliate links, meaning at no additional cost to you, I earn a small commission if you click-through and make a purchase. As an Amazon Associate I earn from qualifying purchases. But rest assured, I will only feature products that I believe are suitable for the purpose being discussed. If you do click-through and purchase from these links, your support of this website means a lot to me and allows me to continue to host and publish helpful content.
I. The Essentials of Drumming
Welcome to the rhythm family! Where you’re the crazy aunt who’s always trying to make people dance. Before we get into a rhythm, let's meet each family member, or, if you’re already sick of the family metaphor, we’ll just talk about each drum part.
Kick/Bass Drum: Often the largest drum in the kit, the kick drum produces a deep, booming sound. It's played with a foot pedal (or two) and provides the heartbeat of your rhythm.
Snare Drum: Positioned between your knees, the snare drum offers sharp, staccato (short) sounds. It's known for its distinctive "crack" and is a signature part of many drummers’ sounds.
Toms: Toms come in various sizes and are placed on the rack on top of the kick drum and on the floor, usually to the right of the kick drum. They provide melody and tonal variation to your drumming.
Cymbals: Cymbals add accents, crashes, texture, or ostinato (a fancy word for a repeating phrase that keeps the beat). Common cymbals include the hi-hat, crash cymbal, and ride cymbal. Effects cymbals are becoming more and more common too, like splash, china, stack, and trash cymbals.
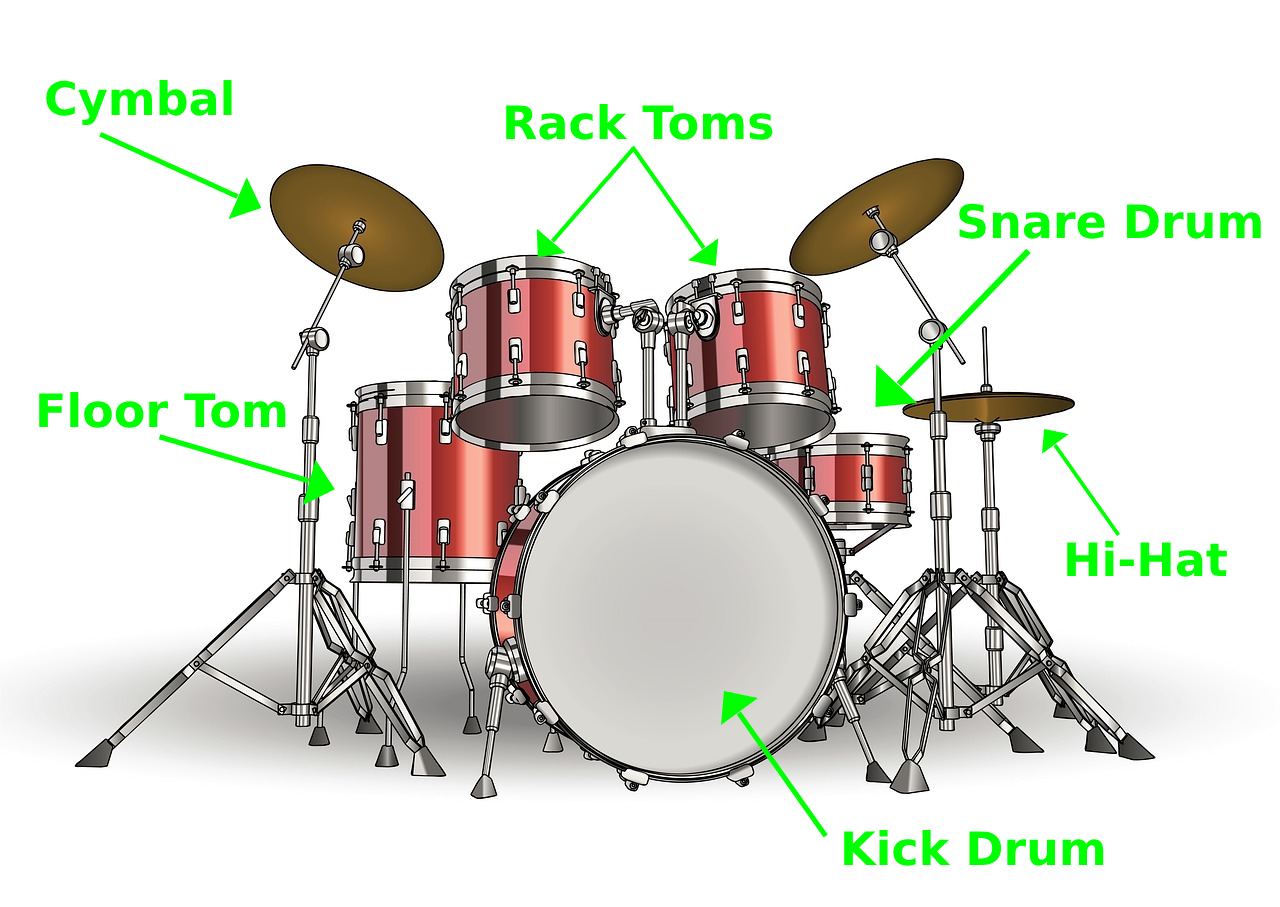
A picture is worth a thousand words though, so let this beautiful annotated illustration of your basic run-of-the-mill drum set do the talking for us.
II. Choosing Your First Drum Kit
Selecting the right drum kit is a big and sometimes expensive decision for beginner drummers. When you’re just starting out though, I think it’s okay to settle for “good enough.” My first drum kit was a small trap kit with only a kick drum, snare drum (which I got from concert band in elementary school), one rack tom, a floor tom, and a wafer-thin splash cymbal that was connected to the kick drum and cheap enough to bend it just by looking at it. Heck, Dave Grohl of Foo Fighters fame started teaching himself drums on pillows in his bedroom. In the end, your choice shouldn’t break your budget and should depend on how much space you have and what kind of music you want to play.
A. Budget Considerations
Before you dive in, set a realistic budget. Drum kits come in a WIDE price range, from just a couple hundred dollars to thousands of dollars. You should also think about accessories like drum heads, sticks, and a throne (a fancy word for a stool–get off your high horse, drummers).
B. Acoustic vs. Electronic Drums
Acoustic Drums: These traditional drums produce sound acoustically and are more authentic. They can be used for rehearsing, live performance, or anything else. However, they can be loud enough to force the neighbors to call the cops on you when you’re 17, trying to learn your first Blink 182 song (ahem…I digress).
Electronic Drums: Ideal for those with limited space or noise concerns, electronic drums offer adjustable volume levels, the ability to listen through headphones, and versatile sound options. They typically can’t be used for live performances though or when rehearsing with a band.
C. Starter Drum Kits
If you're just beginning, consider starter drum kits designed for beginners like the trap kit I reminisced about above (although many trap kits are for kids). They usually include the essential components and strike a good balance between affordability and quality. Here are a few options for starter kits (Full Disclosure: As an Amazon Associate I earn from qualifying purchases. BUT rest assured, I will not recommend anything that I do not believe is suitable for the purpose being discussed).
*Important: Product prices and availability are accurate as of the date/time indicated and are subject to change. Any price and availability information displayed on Amazon at the time of purchase will apply to the purchase of this product.
D. Used Drum Kits
Exploring the used market can save you money too. Ensure the kit is in good condition, and try it out to assess its sound and playability. If you want to be a real gearhead, you can listen for different sounds and tones by trying different materials (i.e. different types of wood, steel, aluminum, etc.), drum sizes, lug arrangements, bearing edges, and so many other options.
III. Setting Up Your Drum Kit
Now that you've chosen your drum kit, it's time to get it set up and sounding great. Proper setup will make sure you’re comfortable and producing optimal sound.
A. Assembling Your Drum Kit
Position the Bass Drum: Place the kick drum a few feet in front of your throne. The pedal should be within easy reach of your foot and your knee should be bent at about 90 degrees when your foot is on the pedal.
Snare Drum Placement: Position the snare drum between your knees. Its height should allow you to strike the drum head cleanly without hitting the rim. It should be positioned directly in front of you.
Toms: Attach the rack toms to the drum rack, placing them within reach. Place your floor tom to the right of the kick drum where you can easily reach it.
Cymbals: Here’s where you can get creative. Typically, at least for right-handed drummers, the hi-hat goes to the left of the snare drum where you can easily reach the pedal with your left foot while keeping your left knee at a 90 degree angle. The ride cymbal often goes to the right over the floor tom and the crash and effects cymbals go…wherever. you. want. Just make sure you can reach them all without stretching.
C. Tune them up!
Before playing, you need to make sure your drum heads are tuned to your liking. Use a drum key to adjust the tension of each drumhead. Tightening the tension rods raises the pitch and tends to make them resonate more and loosening them lowers the pitch and makes them resonate less with a classic “thud” type of sound (also known as “attack”).
However you like your drums to sound, just make sure that each tension rod is tuned consistently around the drum, which you can test by lightly tapping the drum head near the tension rod, then lightly tapping near the tension rod on the opposite side of the drum and listening to see if they are pitched the same. Go around the whole drum testing near each tension rod.
IV. Basic Drumming Techniques
Now that your drum kit is set up, it's time to dive into some basic drumming techniques.
A. Drumstick Grip
Matched Grip: Hold both drumsticks with your palms facing down in the center of your hand, and the sticks parallel to one another. Wrap your middle finder, ring finger, and little finger around the stick and lightly pinch the stick between your thumb and forefinger. Your thumb and forefinger form a fulcrum for control.
Traditional Grip: For this grip, your dominant hand holds the stick just like we described above for matched grip, but your non-dominant hand uses a palm-up grip. If you’re right handed, you would hold your left hand out with your palm facing to the right. Rest the stick in the crook (crotch? finger pit? like the armpit of your fingers?) between your thumb and forefinger and rotate your wrist to strike the drum. This grip is typically used for jazz drumming.
B. Hand and Foot Coordination
You don’t even need to be behind a drum kit to develop coordination between your hands and feet! You can do this at your desk with your hands, on your lap, at the dining table, wherever annoys your spouse or coworkers the most. Start with simple exercises, like alternating right-left-right-left with your hands or feet (or any combination of the two) or playing eighth-note beats (count 1-and-2-and-3-and-4-and-1-and-2-and-3-and-4-and…) with one hand or foot while playing quarter-note beats (count 1-2-3-4-1-2-3-4…) using another idle appendage. Gradually increase complexity as you become more comfortable.
C. Basic Drumming Notation
I could write a whole series of blog posts on how to read music, and the topic could easily overwhelm this beginner’s guide with talk of time signatures, images of music ledgers, and examples of rudiments and sticking combinations. Suffice it to say that the most common time signature in most music is 4/4. This means that there are four beats in each measure and each beat is a quarter note. Or, if you prefer, one measure equals a whole and it’s broken up into four quarters (four beats, or four quarter notes). Count it by saying “1-2-3-4”.
An eighth note is half of a quarter note. Or, if you prefer, it takes two eighth notes to equal one quarter note. Count it by saying “1-and-2-and-3-and-4-and”. The same goes for sixteenth notes, thirty-second notes, etc. Get it?! Drum math is fun!
On a music ledger, each drum appears on a different line of the ledger, generally with the lowest pitched drum (the kick drum) found at the bottom of the ledger and working their way up the ledger as the drum pitches get higher. Cymbal notes are usually shown as an “x”.
Learning to read music takes time and practice, but it’s a great way to have all of the music of the world at your fingertips.
V. Developing a Practice Routine
Consistent practice is the key to becoming a great drummer. Establishing a structured practice routine will help you progress steadily and efficiently, but don’t take on too much all at once or you could easily burn yourself out. Start with short structured practice sessions and give yourself some unstructured time too just to enjoy the experience. Here's how to get started:
A. Warm-Up Exercises
Begin each practice session with warm-up exercises to prepare your muscles and improve flexibility. Roll your wrists, perform finger stretches, and practice rudiments at a slow tempo while gradually increasing your speed.
B. Skill-Building Exercises
Dedicate a portion of your practice time to skill-building exercises. Focus on techniques like rolls, flams, and accents. These exercises improve your precision, speed, and control. Use a metronome to get a feel for proper timing.
C. Playing Along with Music
Apply what you've learned by playing along with your favorite songs or drumming tracks. This helps you develop a sense of timing and groove and makes it more fun! Start with simpler songs and gradually move on to more complex rhythms as your skills improve.
D. Metronome Practice
Incorporate a metronome into your routine. It helps you develop a steady sense of timing and rhythm. Start at a slow tempo and gradually increase it as you become more comfortable. As playing to a metronome gets easier, increase the difficulty by playing with the metronome on the offbeats or slow the metronome way down and time your playing so each click falls on the first beat of each measure.
E. Set Goals
Establish clear, achievable goals for each practice session. Better yet, keep a journal of your goals and use it to track your progress, record your maximum tempos each day, and recall what you worked on. Whether it's perfecting a particular beat or increasing your speed, having goals and seeing your progress will keep you motivated and focused.
VI. Conclusion
Congratulations on starting your drumming journey! This guide hopefully equipped you with some basic knowledge that will give you confidence to go out there and give it a try. At the end of the day, remember that drumming is fun, music is therapeutic, and this should be something you enjoy. Don’t take it too seriously. Drumming is an art, which means you can (and should) be creative, make it your own, and do it however you want to do it. They say you should march to the beat of your own drum, but we don’t all know what that sounds like. I say we should explore, find a beat that is special to us, and play it every minute of every damn day.
VII. Call to Action
Join our drumming community! Share your thoughts, questions, and experiences in the comments. Don't miss out on more drumming tips and updates—subscribe to our newsletter for the latest news and insights. Your drumming journey is just beginning, and we're here to help you find your beat!